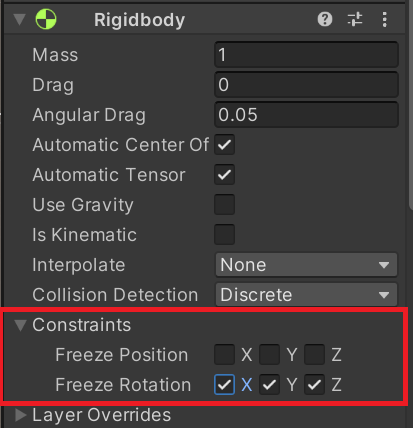
飞行和射击 冻结旋转 物体的Rigidbody组件可以给物体增加物理属性。
增加弹簧 在我们的角色中添加一个Configurable Joint组件。并且修改Y方向的弹簧效果及修改Y Drive。
给第一个属性赋值。这时当我们向上拖动我们的角色的时候,就会发现我们的角色进行着简谐运动。而且可能会出现穿模,还有穿到地板下面卡住。这是因为,在unity中,当物体的移动速度过快,就会造成穿模现象。当我们的角色穿过地板之后,再往回穿时,可能速度变慢,结果就被迫当了土行孙。
继续测试,发现我们的角色会一直蹦蹦跳跳变成兔子。显然我们不需要兔子警官。所以我们可以给我们的角色设置一个摩擦力。在Rigid body中给Drag赋值。Drag为空气阻力。当我们的角色下落时受到空气阻力,下落速度就会变慢。简单的物理学。
实现飞行功能 在PlayerInput脚本中设置一个向上的推力
1 2 3 [SerializeField ] private float thrusterForce = 20f ;
y轴的坐标轴为上,所以当我们按住空格时给y轴方向一个向上的力。
1 2 3 4 5 6 7 8 9 Vector3 force = Vector3.zero; if (Input.GetButton("Jump" )){ force = Vector3.up * thrusterForce; }
然后在PlayerController脚本中获取玩家的输入。
1 2 private Vector3 thrusterForce = Vector3.zero;
1 2 3 4 5 public void Thrust (Vector3 _thrusterForce ){ thrusterForce = _thrusterForce; }
在PerformMovement函数里加一个判断
1 2 3 4 5 if (thrusterForce != Vector3.zero){ rb.AddForce(thrusterForce); }
再把Input计算的force值传递给controller
1 2 controller.Thrust(force);
PlayerInput.cs和PlayerController.cs的完整代码:
Input:
1
2
3
4
5
6
7
8
9
10
11
12
13
14
15
16
17
18
19
20
21
22
23
24
25
26
27
28
29
30
31
32
33
34
35
36
37
38
39
40
41
42
43
44
45
46
47
48
49
50
51
52
53
54
55
56
57
58
59
60
61
62
63
64
65
66
67
68
69
70
71
72
73
74
75
76
77
78
79
80
81
82
83
84
85
86
87
using System.Collections;using System.Collections.Generic;using UnityEngine;public class PlayerInput : MonoBehaviour { [SerializeField ] private float speed = 5f ; [SerializeField ] private float lookSensitivity = 8f ; [SerializeField ] private PlayerController controller; [SerializeField ] private float thrusterForce = 20f ; void Start () { Cursor.lockState = CursorLockMode.Locked; } void Update () { float xMov = Input.GetAxisRaw("Horizontal" ); float yMov = Input.GetAxisRaw("Vertical" ); Vector3 velocity = (transform.right * xMov + transform.forward * yMov).normalized * speed; controller.Move(velocity); float xMouse = Input.GetAxisRaw("Mouse X" ); float yMouse = Input.GetAxisRaw("Mouse Y" ); Vector3 yRotation = new Vector3(0f , xMouse, 0f ) * lookSensitivity; Vector3 xRotation = new Vector3(-yMouse, 0f , 0f ) * lookSensitivity; controller.Rotate(yRotation, xRotation); Vector3 force = Vector3.zero; if (Input.GetButton("Jump" )) { force = Vector3.up * thrusterForce; } controller.Thrust(force); } }
Controller:
1
2
3
4
5
6
7
8
9
10
11
12
13
14
15
16
17
18
19
20
21
22
23
24
25
26
27
28
29
30
31
32
33
34
35
36
37
38
39
40
41
42
43
44
45
46
47
48
49
50
51
52
53
54
55
56
57
58
59
60
61
62
63
64
65
66
67
68
69
70
71
72
73
74
75
76
77
78
79
80
81
82
83
84
85
86
87
88
89
using System.Collections;using System.Collections.Generic;using UnityEngine;public class PlayerController : MonoBehaviour { [SerializeField ] private Rigidbody rb; [SerializeField ] private Camera cam; private Vector3 velocity = Vector3.zero; private Vector3 yRotation = Vector3.zero; private Vector3 xRotation = Vector3.zero; private Vector3 thrusterForce = Vector3.zero; public void Move (Vector3 _velocity ) { velocity = _velocity; } public void Rotate (Vector3 _yRotation, Vector3 _xRotation ) { yRotation = _yRotation; xRotation = _xRotation; } public void Thrust (Vector3 _thrusterForce ) { thrusterForce = _thrusterForce; } private void PerformMovement () { if (velocity != Vector3.zero) { rb.MovePosition(rb.position + velocity * Time.fixedDeltaTime); } if (thrusterForce != Vector3.zero) { rb.AddForce(thrusterForce); } } private void PerformRotation () { if (yRotation != Vector3.zero) { rb.transform.Rotate(yRotation); } if (xRotation != Vector3.zero) { cam.transform.Rotate(xRotation); } } private void FixedUpdate () { PerformMovement(); PerformRotation(); } }
这时我们的角色就可以起飞了。但是我们的角色只能贴地飞行。这是因为我们向上的力和重力持平。我们的物体就会卡在同一高度不能再向上。此时有两种解决办法,一种是加大我们的上升力。或者减少我们的重力。但是这种情况会造成我们的物体上升过快或者下降过慢。
我们可以采用另一种方法,就是在我们起飞时,将我们的弹力取消掉。
首先在Input里引用组件ConfigurableJoint
1 2 3 4 5 6 7 8 9 10 11 12 13 private ConfigurableJoint joint;void Start (){ Cursor.lockState = CursorLockMode.Locked; joint = GetComponent<ConfigurableJoint>(); }
然后在跳跃时禁用弹簧组件
1 2 3 4 5 6 7 8 9 10 11 12 13 14 15 16 17 18 19 20 21 22 23 24 if (Input.GetButton("Jump" )){ force = Vector3.up * thrusterForce; joint.yDrive = new JointDrive { positionSpring = 0f , positionDamper = 0f , maximumForce = 0f , }; } else { joint.yDrive = new JointDrive { positionSpring = 20f , positionDamper = 0f , maximumForce = 40f , }; }
此时就可以飞行
限制玩家视角 我们的角色可以变成大陀螺,可以上下无限的转圈。这显然是我们所不想看到的。所以在PlyaerController中添加一个判断。记录我们累计转了多少度,然后给一个上限。让我们的视角保持在正常范围内。
1 2 3 4 5 6 7 8 9 10 11 12 13 14 15 16 17 18 19 20 21 22 23 24 25 26 27 28 29 private float cameraRotationTotal = 0f ;[SerializeField ] private float cameraRotationLimit = 85f ;private void PerformRotation (){ if (yRotation != Vector3.zero) { rb.transform.Rotate(yRotation); } if (xRotation != Vector3.zero) { cameraRotationTotal += xRotation.x; cameraRotationTotal = Mathf.Clamp(cameraRotationTotal, -cameraRotationLimit, cameraRotationLimit); cam.transform.localEulerAngles = new Vector3(cameraRotationTotal, 0 , 0 ); } }
此时发现往下看和网上看最多只能转85度
实现射击功能 在FPS游戏中,射击功能通常是由玩家的摄像机发出一条射线,再配合枪口的火焰来完成射击功能的实现。
为了让枪的各个数据为一组,新建一个脚本PlayerWeapon
1
2
3
4
5
6
7
8
9
10
11
12
13
14
15
16
17
18
using System;using System.Collections;using System.Collections.Generic;using UnityEngine;[Serializable ] public class PlayerWeapon { public string name = "M16A1" ; public int damage = 10 ; public float range = 100f ; }
在Player中添加一个PlayerShooting脚本。来完成射击功能的实现。
射击的具体实现:
先来实现单发模式(GetButtonDown就是点一下射击一下,Get Button就是按住一直射):
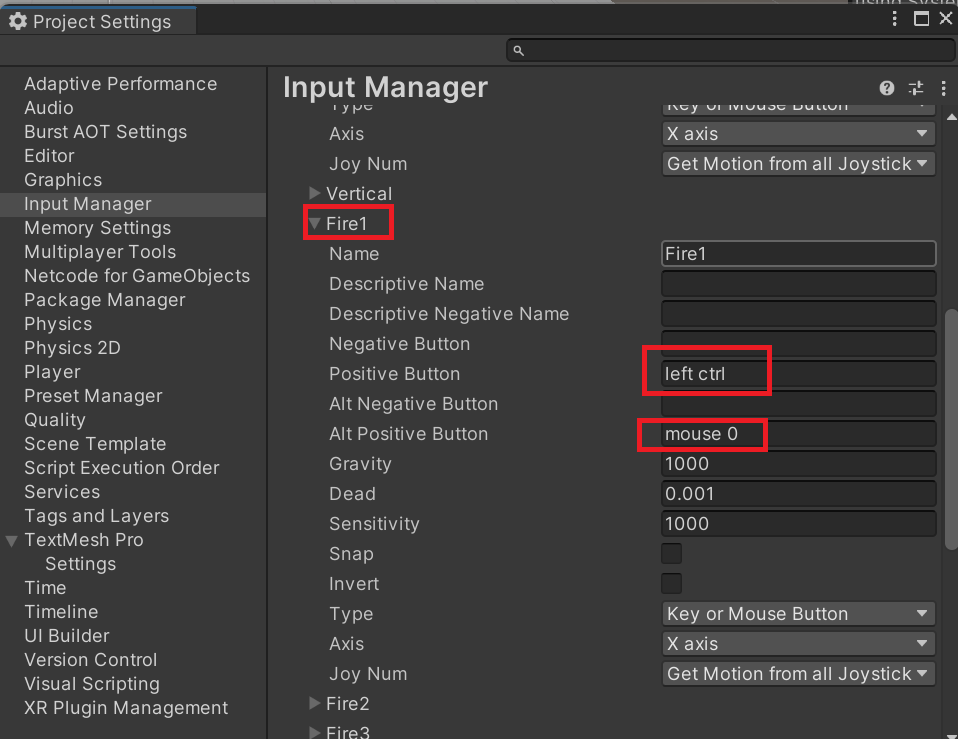
注意在InputManager中的Fire1,左键和左CTRL用来Fire1,左CTRL未来用作蹲下,所以把左CTRL去掉
1
2
3
4
5
6
7
8
9
10
11
12
13
14
15
16
17
18
19
20
21
22
23
24
25
26
27
28
29
30
31
32
33
34
35
36
37
38
39
40
41
42
43
44
45
46
47
48
49
50
51
52
53
54
55
56
57
58
59
using System.Collections;using System.Collections.Generic;using UnityEngine;using UnityEngine.UI;public class PlayerShooting : MonoBehaviour { [SerializeField ] private PlayerWeapon weapon; [SerializeField ] private LayerMask mask; private Camera cam; void Start () { cam = GetComponentInChildren<Camera>(); } void Update () { if (Input.GetButtonDown("Fire1" )) { Shoot(); } } private void Shoot () { RaycastHit hit; if (Physics.Raycast(cam.transform.position, cam.transform.forward, out hit, weapon.range, mask)) { Debug.Log(hit.collider.name); } } }
设置玩家名 在PlayerSetup脚本中,start()调用以下函数
1 2 3 4 5 6 private void SetPlayerName (){ transform.name = "Player" + GetComponent<NetworkObject>().NetworkObjectId; }
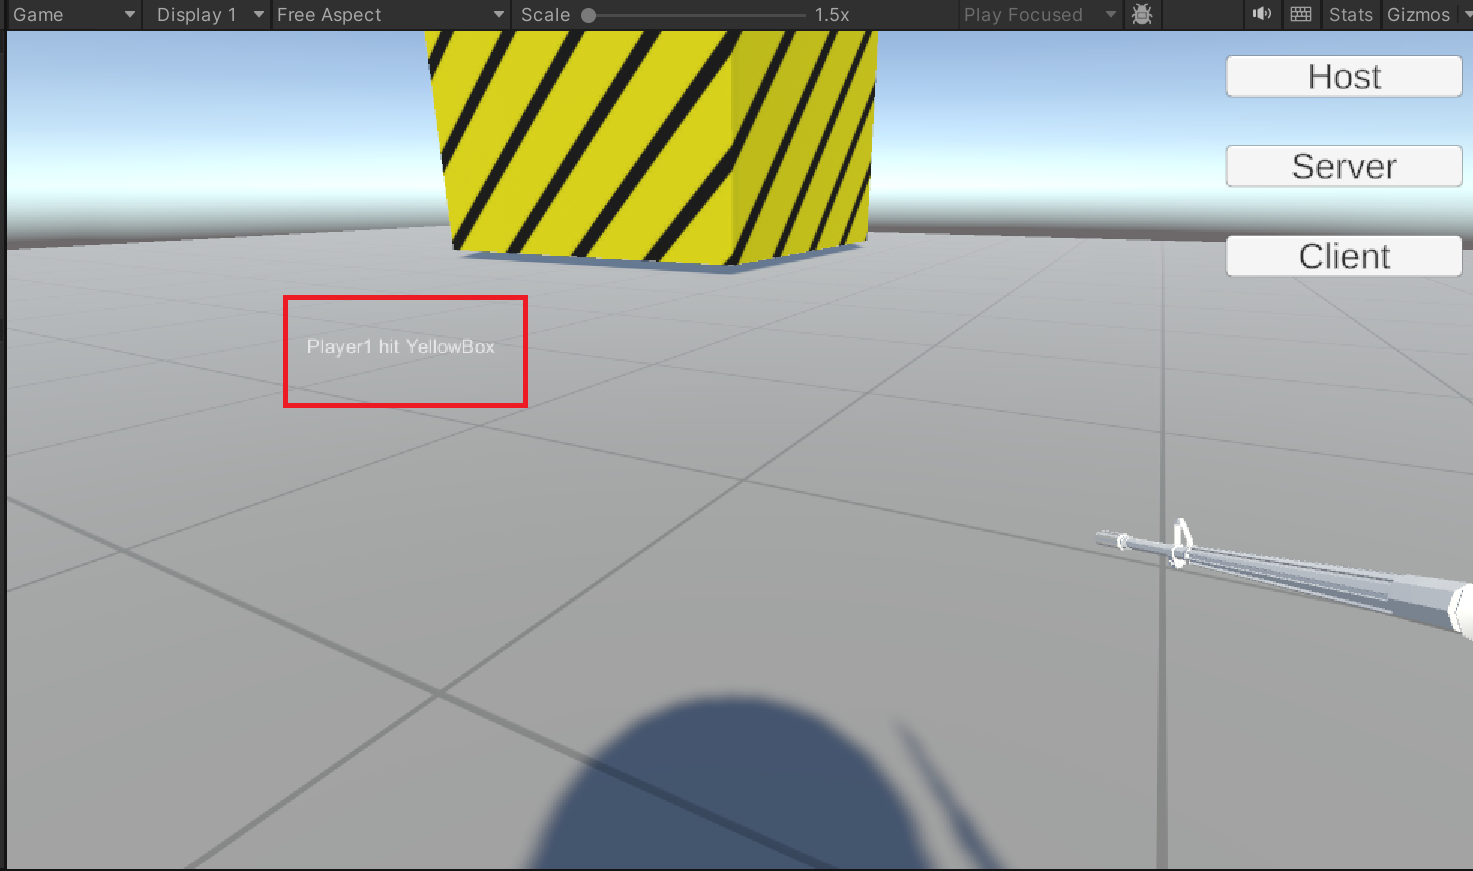
给服务器传消息 在PlayerShooting类中
1
2
3
4
5
6
7
8
9
10
11
12
13
14
15
16
17
18
19
20
21
22
23
24
25
26
27
28
29
30
31
32
33
34
35
36
37
38
39
40
41
42
43
44
45
46
47
48
49
50
51
52
53
54
55
56
57
58
59
60
61
62
63
64
65
66
67
68
using System.Collections;using System.Collections.Generic;using Unity.Netcode; using UnityEngine;using UnityEngine.UI;public class PlayerShooting : NetworkBehaviour { [SerializeField ] private PlayerWeapon weapon; [SerializeField ] private LayerMask mask; private Camera cam; void Start () { cam = GetComponentInChildren<Camera>(); } void Update () { if (Input.GetButtonDown("Fire1" )) { Shoot(); } } private void Shoot () { RaycastHit hit; if (Physics.Raycast(cam.transform.position, cam.transform.forward, out hit, weapon.range, mask)) { ShootServerRpc(hit.collider.name); } } [ServerRpc ] private void ShootServerRpc (string hittedName { Debug.Log(transform.name + " hit " + hittedName); } }
自己窗口只允许自己射击 把Player Shooting组件加入到禁用组件列表中
在游戏界面显示调试信息(用作调试,可以不需要) 新建一个Empty命名为GameManager,新建一个脚本也命名为GameManager,将这个组件添加到Game Manager里
1
2
3
4
5
6
7
8
9
10
11
12
13
14
15
16
17
18
19
20
21
22
23
24
25
26
27
28
29
30
31
32
33
34
35
36
37
38
using System.Collections;using System.Collections.Generic;using UnityEngine;public class GameManager : MonoBehaviour { private static string info; public static void UpdateInfo (string _info { info = _info; } private void OnGUI () { GUILayout.BeginArea(new Rect(200f , 200f , 200f , 400f )); GUILayout.BeginVertical(); GUILayout.Label(info); GUILayout.EndVertical(); GUILayout.EndArea(); } }
在PlayerShooting里调用
1 2 3 4 5 6 7 [ServerRpc ] private void ShootServerRpc (string hittedName{ GameManager.UpdateInfo(transform.name + " hit " + hittedName); }
此时就可以看到调试信息